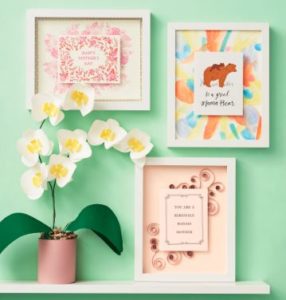
Posts Tagged craft ideas

Decorating kraft letters

I recently found myself needing a gift for a friend of mine… a friend who has everything. I came up with the idea of making him a set of decorative kraft letters in his initials. Although I’ve used glitter to decorate these in the past, I wanted to try a new technique that would create a handsome piece he could display on a shelf in his home.

Heat embossing on kraft letters

Turns out heat embossing using a metallic powder creates an elegant and sophisticated finish. I used the VersaMark Watermark Inkpad on the kraft letters, sprinkled on embossing powders in a mixture of Jade Patina and Metallic Copper, and used the heat embossing tool to set in place. Combining those two embossing powders created a patina that looks similar to an old penny.

In the past I’ve decorated kraft letters with glitter by covering them in PVA, then sprinkling on glitter. These “JOY” letters in True Red Glitter make a great holiday decoration – use in a centerpiece arrangement or display on a mantle surrounded by evergreen branches. You could achieve a different red finish by using the heat embossing technique described above and Cherry Twinkle Embossing Powder.

Glitter kraft letters

My gift of the “JC” initials was extremely well-received, because it was personal and unlike anything he had. They turned out so well in fact that I decorated other kraft letters to display in our store!

–Ken, Paper Source NorthPark Dallas Store
PS colors: chartreuse & pool
Latest fave: Woodgrain A2 Embossed Stationery

How-to: adorable turkey placecards

We have a wonderful customer here in Dedham who loves to create her own special holiday cards and decorations. She visited us recently on our Grand Opening Day in search of a Thanksgiving placecard idea, perhaps a twist on our classic Turkey Placecard Kit. Along with my fellow associate, Calla, I had some fun concocting this adorable turkey placecard for her using our Owl Placecard Kit as inspiration.

Thanksgiving turkey cardWe chose chocolate 4bar oval scallop cards for the body, and cut a few in half to create feathers. We cut poppy 4bar oval scallop cards into feet and a beak, and used red cover paper to make the waddle.

We gave our turkey some stylish eye shadow using gold 1.25″ circle labels. Two circle hole punches created the large white and brown eye components, and a 1/8″ hole punch was perfect for the small whites of the eyes. We think our turkey has some attitude.

Our customer was thrilled with our creation, and we’re looking forward to seeing her group of turkeys soon!

–Colleen, Paper Source Dedham Store
PS colors: beet & chocolate
Latest fave: Flocked Gift Boxes

Our paper dolls are ready for Halloween!

Halloween paper dolls
Halloween is my all time favorite holiday, and I thought our paper dolls should get into the Halloween spirit too! I decided that our paper dolls had classic style and would probably choose traditional Halloween costumes…if they could talk, that is. So I made a Halloween costume collection that included a witch, mummy, ghost, pumpkin and devil.

Mummy paper dollDevil paper doll

I used a variety of different materials for the paper doll Halloween costumes, including chocolate brads for the ghost’s eyes, orange Lokta fine paper for the pumpkin suit and hat, and xmas red Stickles for the devil horns and dress accents. I created the mummy costume using soft white 1/4″ satin ribbon and tons of Zots to hold it all together. The possibilities are endless!

Witch paper dollPumpkin paper doll

I had a great time creating the paper doll costumes, but my favorite part was making miniature trick or treat bags that perfectly match our Trick or Treat Bag Kit!

Happy Halloween!!!!!

–Lonni, Paper Source Annapolis Store
PS colors: papaya & beet
Latest fave: Envelope Liner Template Kit

5 steps to perfect rubber stamping

Here it is, your step by step guide to perfect rubber stamping and heat embossing, just in time for holiday card making*. You see us using these techniques all the time, and there’s a reason for that – they’re super easy and add a professional decorative look to all types of projects. Give it a try and have fun experimenting!

Guide to rubber stamping

Here are the materials I’ve used in this demonstration:
Petal Enclosure (In my finished sample I’ve used dark paper to remind you that this stamping technique works so well on dark colors!)
VersaMark Watermark Inkpad (This clear ink creates a watermark impression, leaving a darker version of the color of your paper.)
Clear Embossing Powder
Heat Embossing Tool
Cottage Bloom Rubber Stamp
• Scrap Paper (Do your work on scrap paper so you can capture excess embossing powder and recycle.)

1. Ink Your Stamp: When working with larger rubber stamps, flip them over to ink them, instead of pressing them down onto an inkpad. Holding them rubber-side up allows you to see when the entire surface is covered with ink, which can be especially helpful when inking with a clear inkpad (the surface will appear shiny when applied).

Rubber Stamping Guide step 1

2. Create Your Stamp Impression: Read the rest of this entry »

How-to: embossing on ribbon

embossed ribbon favor boxAfter Linda (head of workshops) described this technique to me I just had to try it! Embossing on ribbon? Sweet! I think it works best with rubber stamps that have a clean bold image like this cherry blossom. Imagine how lovely this would be wrapped around a package or used to embellish an invitation.

Be on the look out for cool (and free) in-store demos – this embossing on satin ribbon technique was featured in stores this month!

–Annie
PS colors: eco-white & pool
Latest fave: 12″ Guillotine Trimmer — great for cutting large sheets of paper!

Materials Needed:
Pillow Favor Box – Luxe Fino White
Read the rest of this entry »

How-to: fancy bookmark

India-inspired bookmark In addition to being eye-catching, this fancy bookmark allows you to sandwich multiple pages to keep your place. Of course, the decorated front can be stamped with any image and embellished to your heart’s content — I went with an India-inspired theme.

A great way to show your love of reading with a perfectly poetic statement!

–Annie
PS colors: eco-white & pool
Latest fave: 12″ Guillotine Trimmer — great for cutting large sheets of paper!

Materials Needed:
8 1/2″ x 11″ Beet Cover Weight Paper
Read the rest of this entry »

Out-of-the-box gift wrap ideas

creative gift wrap ideas
Like all faithful paper geeks, my favorite part of gift giving is the wrapping. Here are two unusual techniques I like to use that often get a “wow.”

Masu box baseOrigami box
An origami box is a super cool way to make your own gift box out of any paper. This site has great instructions for creating the box. Here are a few additional tips to keep in mind:
- To create the box base, just repeat instructions cutting a square approximately 1/8” smaller. This will allow the lid to fit over the base.
- Experiment with different papers to accommodate the weight of the gift you are wrapping.
- Be sure to go back in and reinforce any folds (especially sides of box so that edges are crisp) using a bone folder. Use double stick tape or decorative stickers to hold the inside flaps of box secure (see photo). Read the rest of this entry »

How-to: decorative silhouette box

Bird silhouette how to
Using our box mailers as a frame, this silhouette box makes a great homemade wall decoration! Choose any colors or prints, and any silhouette– here we used a bird along with a paper from our India collection. Personalize the silhouette by tracing a photo of a family member or favorite pet!

Materials Needed: Read the rest of this entry »

Using fine paper in everyday ways

PS envelope liners One of the things that is so stunning about Paper Source is all of the gorgeous fine papers from around the world. I walk in the store and pause to just say “ahh” at the beautiful ladders full of papers. Like many customers, however, I haven’t always been sure what to do with them (especially the papers I buy and save at home because they are “too special” to just wrap a present with). Some people are technically skilled at bookbinding or collaging and make incredible paper projects. My favorite uses are a bit more everyday– accessible techniques that are also inspiring and fun (relying on the artistry of the paper for a great result, rather than any required artistic perfection on my part!). Read the rest of this entry »